Showing posts with label Hazelton. Show all posts

Thursday, September 26, 2024

Friday, August 30, 2024

A new venture


Guess what I've gone and done.....yup, I've started a new, stand-alone, blog for all my dolls' house ramblings 👏  So now there will be somewhere else for you to visit that you'll most likely find even less interesting than here on My Cosy Orkney Home (MCOH) 😄

It's actually something that I've been thinking about doing for well over a year now.  This is such a busy little blog ~ it's more of a diary, I suppose, of what's going on in my life so it's full of all kinds of everything.  I really wanted somewhere that was simply devoted to both my dolls' house hobby and what was happening in Hazelton ~ hence the new blog.

I don't suppose for one minute that I will be working on my dolls' houses until the bad weather sets in so don't expect posts on the new blog any time soon 😉  I want to get as much done in the garden as possible before the winter weather sets in.  Plus I have the very big task of getting my craft room in a fit state to actually do any work in!  It's in a terrible mess at the moment as it's become a dumping ground yet again, plus we rearranged the furniture in there when we moved the sideboard out into the porch so that's added to the upheaval.

I'm still pondering over what to do about all the dolls' house posts that are here on MCOH.  I think I will most likely end up copying them and reposting on the new blog, leaving the original posts in place here for posterity.  I'm not sure at the moment about how to set them up on the new blog as I don't want to be mixing them in with new posts that I make.  Hopefully I'll think of some suitable way to do what I want in due course.  Mind you I've still got an awful lot to get done in the garden before winter, so I don't imagine there will be time for doll's house tinkering any time soon! 

Just on the off-chance that any of you might be interested, my lovelies, I will be putting a little note on here when I do post on the new blog 😏

Thursday, August 31, 2023

Slightly less scary 😉


image from Clipart Library

I got out the Sonicrafter to make an actual hole this time, rather than simply trimming off edges.  Now to be honest I really don't know what the various blades are called, but when I trimmed the edges of the upper house base I used a semi-circular one to work my way across in a straight line.  This time I used a rectangular one with the teeth just at one end to make plunge cuts.  There ~ now you know as much as me, in fact I'm pretty sure it's highly likely that you know a helluva lot more than me 😄


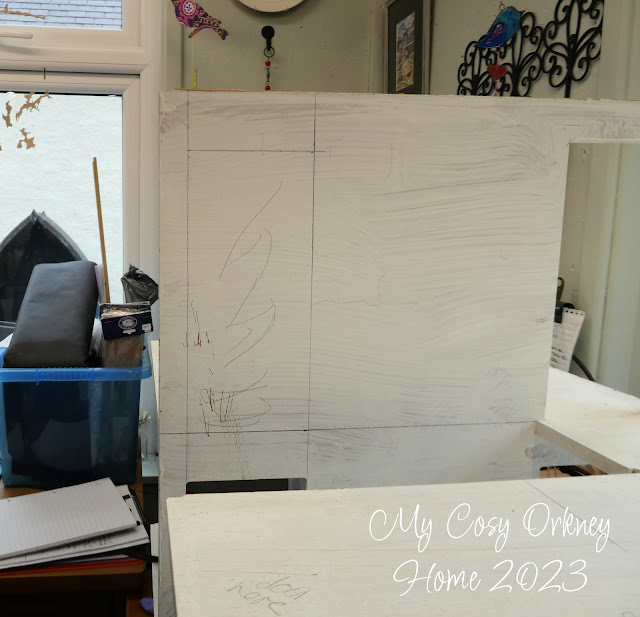
I didn't take these photos at a very good angle, so you may have to tilt your head a wee bit ~ sorry about that 😏  Anyhoo, this is what will be the third floor of the completed house and is in effect Lady Constance's floor.  Her bedroom is beyond the wall and I'm taking the photo from what will eventually be her bathroom.

As I mentioned previously the floors below had two doorways so that folk could get from one staircase to the other, but since there was no access up to the attic this floor simply had the doors to the rear of the house.  This does not fit in with my plans so I needed to cut out a doorway at the front ~ the door at the rear will be blocked in later.  I took my time with the measuring ~ you know, all that "measure twice, cut once" malarky 😉  You may be able to see that the original doorways are a little taller than what is needed for the doors I purchased (from Bromley Craft Products if you're interested, who seem to have become my first port of call when I'm looking for stuff!), so there will have to be a little filling-in along the top of the other doorways.


Since I was cutting out a new hole here I was able to make it to the correct dimensions.  I must admit that I found making this doorway a wee bit harder than the trimming I did the other day, but since it's only the second time that I've ever used anything even remotely like the Sonicrafter I'm still pleased with my efforts 😊


Thank goodness, though, for architrave!

Next step is working out how to configure those pesky staircases 😕

Tuesday, August 29, 2023

A tad scary 😟

image from Clipart Library


I admit that I've been procrastinating but I finally pulled up my big girl panties and used my anniversary gift from Adrian ~ the oscillating multi tool.  I've been putting it off because using power tools is all very new to me and to be honest I was feeling a tad scared 😮  But needs must as I really wanted to get the base of the upper house trimmed.  It's only a few centimetres bigger all round than the top of the basement so I wanted to bring it as close as possible to those dimensions.  

The first job was to trim off the front edge which as you can see in the photo above extends beyond the front of the house, either side of where the original entrance door was positioned.  As luck would have it, simply trimming in a straight line brought the whole of that edge level, and doesn't affect the opening front panels.  The upper house now sits level with the top of the basement.  The top of the basement overhung its own walls in any event and I'm still undecided whether I like how that looks or not.  If I decide it doesn't look quite right I will just add some simple moulding all round to soften the transition.

I was quite nervous when I began cutting but I took it very slowly, starting with the lowest power level. 

After I had trimmed the left-hand side, I felt a little more confident to move up to power level number 2 😄  The base of the upper house now sits level with the top of the basement at the front.  It does still extend a couple of centimetres or so at the back but I've decided to leave that be.  I think I may well be able to absorb that overhang with the plans I have in mind for the whole of the back of the house.

The upper house base also extends about a centimetre either side of the basement top so I decided to be brave and trim the side edges, too 😧


Once again luck was on my side as it just so happened that the side walls of the upper house fit in grooves on the base.  Trimming off a centimetre from the very edge doesn't affect the sides from still sitting in the grooves, although I shall have to glue them in very securely when I rebuild the house.


I clamped the base to my bench to do all the cutting and was able to keep it held pretty firmly.  I know I haven't done a perfect job by any means, but I am still happy with the end result.  Ultimately the whole of the house will be "clad" with textured wallpaper to represent harling (roughcast render), similar to how our real-life house is finished, which will hopefully cover up a multitude of sins 😉 


I've been very sensible, by the way, and have equipped myself with appropriate dust masks.  They are probably the most uncomfortable masks I've ever worn but better safe than sorry, eh?  Dust from MDF is horrible stuff and I definitely don't want to be breathing it in ~ I also vacuumed as soon as I'd trimmed each edge before moving on to the next section.  I look quite a fright, I know 😏


I had a rummage in the dolls' house garden stash and found a bench for the lads to sit on ~ they were very happy to relax and watch me, offering lots of "helpful advice" as I'm sure you can imagine 😄

Monday, August 28, 2023

And then there was the basement...


As I mentioned in my previous post not only are there a whole heap of issues with the upper house, the basement isn't problem-free either 😒  It's called the Copford basement and I've had it so long that I can't even remember what company made it!  What I do know, however, is that I bought it because I wanted an additional floor and it was close to the size of the Somerby house.

Its opening panels are on the sides so that creates a bit of a problem straightaway.  Because my ultimate aim is to have it in our new porch, every time I want/need to get to the rooms I shall have to turn the house since the cabinet it will be displayed on won't be sitting in the middle of the room in splendid isolation!  However that's not too much of a problem because I don't think I will actually be needing/wanting to get inside every five minutes.   


Nope, a far bigger problem takes us right back to the thorny issue of stairs yet again *sigh*  Before I removed the lower section of the back of the upper house, I balanced it on the basement (minus its base) so that I could see how things lined up.....or didn't, as you can see.  To be fair, I wasn't really expecting the walls to line up since the basement wasn't made for the house.  Had the rooms in the basement been set the other way around, though, then I think the dividing wall wouldn't actually have been that far off being in line with the walls on the left-hand side of the upper house.

I've finally come to the conclusion that the most sensible solution for the upper house is to make the rooms on the right smaller, so that the landing areas can be large enough to accommodate dog-leg staircases.  I've been saving cardboard boxes so that I've got plenty of material to try some mock-ups before I commit to anything 😄  I shall also have to go down this route with fitting stairs from the basement.  I think I shall get the stairwells cut out in the upper house, including the base, then use said base as a template for the top of the basement.  I will cut out the corresponding hole for the stairwell and see what I can do to alter the dividing wall in the basement to accommodate it.  Of course had the upper house and basement been three or four inches deeper I could have had runs of straight staircases, which would have been very much simpler all round. 

This wall needs some alterations anyway because I want the doorway between the two rooms set closer to the front wall.  It may come down to having to actually move the wall further to the left so that it is in line with the walls in the upper house.  The problem with that is that the walls are all set in routed out grooves, so I would either have to try to rout some new grooves or trim down the wall so that it is simply set between the base and the ceiling.  As they say, watch this space 😉    


So after Derek and I had had a long chat about all the staircase issues, he pointed out other problems he and Albert had come across too.


First of all, the doorway from the basement out to the garden area is simply not tall enough ~ it's not very wide either!  What do you think of Derek's pink trainers, by the way?  He wore them all day for a bet ~ I believe he won a few pints down at his local that evening 😄 


It would be very awkward getting out of the door beneath those steps to the upper house.


The steps themselves are also somewhat steep, narrow...


and uncomfortable to walk up and down.


And just look at all that unusable space beneath what is meant to be used as the pavement!


The upshot of all this was that after consultations with Sir Peter, Lady Constance, and Christopher the decision was made that the entrance to Augusta Lodge will be moved to the side of the basement, as I mentioned in the previous post.  This really opens up the space in front of the basement, which will make a nice little courtyard garden in due course.  There are going to be a number of alterations made to the front house wall of the basement ~ it's a bloody good job I've got that shiny new tool so I can help the lads out 😄


I'm pretty sure the lads weren't terribly thrilled when I showed them the schedule of works Sir Peter and I had drawn up (that's what's on the clipboard on the right) even though I bought them a couple of shiny new saws ~ especially young Graham, who I expect sees his future holding much more physically exerting work than he is used to 😄 

Thursday, August 24, 2023

Demolition...

image from Clipart Library
...albeit on a mini scale 😉

This is Augusta Lodge, which is to be the new home of Lady Constance and her brother, Christopher.  It's the first dolls' house I bought, a very long time ago, and I never did get it built ~ as you can see!  It's the Somerby House made by Barbara's Mouldings, I believe.  There were issues with it right from the start which had I been more experienced in the world of dolls' houses I would perhaps have picked up on.  And since it's just been hanging around waiting for me to do something with it, the problems have increased what with warping and bits falling off!


Now that my dolls' house tastes have become more "sophisticated", for want of a better word, I was sorely tempted to just scrap the thing altogether!  But my bloody-mindedness kicked in and I decided to have a go at making it into what I ~ well, to be more accurate I suppose I should say what Lady Constance and Christopher 😉 ~ want it to be.  Because the house, for me personally, is so disappointing I haven't really got anything to lose if my kit-bashing totally wrecks it or my ambitions prove to be greater than my capabilities.  Mind you Lady Constance and Christopher may be a tad upset if I can't rebuild it 😄 


The biggest issue is how unrealistic the stairs in the house are.  The original layout had straight staircases from one floor to the next with no landings running alongside the stairwells.  The people were expected to turn to the left or right at the top of the stairs, and walk through that room to get to the next set of stairs ~ I'm sure you can see how irritating I found this!  So even back when I first got the thing I tried to remedy the situation by moving one of the walls further to the right to make a landing, even though I had to sacrifice some of the space in the room.  As for access into the attic, as far as I can recall I don't believe there was any from within the house, even though the front of the roof was hinged to allow access from outside 😒

So I rolled up my sleeves and dug out my trusty little stubby hammer and an old screwdriver.  The latter is a little bent (not by me, I hasten to add!) and I have no idea where it came from but I thought it would be the ideal accompaniment to the hammer for the purposes of demolition.


I took it slow and steady, and the attic floor and sides of the house came apart without too much trauma.  Because the head of the screwdriver is small I was able to gently tap it into the areas where the house has been glued together and prise things apart.  The back panel is made up of two pieces and the top section came away fairly easily.  

The lower section, though, was much more reluctant, perhaps because it was covering more of the back and so was glued to more sections of the house.  At one point I seriously thought about just leaving it be, but because I need to move the stairwells I decided to persevere as the job would be a tad easier if the whole of the back panel was removed.

If I could have "flat-packed" the house entirely I would have done so but decided not to push my luck any further!  I shall just have to make the new stairwells as best I can with the floors/ceilings still in place.  I'm sure ceiling paper and floorboards will hide a multitude of repair sins 😏 


Decisions then had to be made about the front panels.  The house is being set on a basement (more about the traumas of that to come!) and the entrance will be from the ground floor.  This means that the space for the door on what has now become known as the "upper house" is redundant.  I also can't find any of the window inserts that came with the house so decided the best thing would be to change the windows altogether.


In fact the whole façade is going to be changed as I didn't really care for this stepped-out section...


..so used my tried-and-tested hammer and screwdriver technique to prise it off.  I think it looks much neater now and hopefully will make it a little easier to resize the window holes for the new windows in due course.

Still lots and lots to do including the trauma of the basement which I'll share in my next post 😳

Tuesday, August 22, 2023

An early anniversary gift


This is actually from Adrian to me, just in case you were wondering 😉  Well, I did tell you that now my craft room is all spick-and-span I'm going concentrate on my little dolls' house world  ~ I've got a lot of Very Big Plans for Hazelton😄  


The "renovation" of Hazelton ground to a halt, mostly because I really didn't have anywhere suitable to display all the houses I let myself be tempted to buy and totally lost interest.  Now, though, I've got the space to both work on them and display them too.  

I have introduced you to the little trio above previously but it's such a long time ago that I'm sure you will have forgotten all about them!  So just to refresh your memories we have Constance, Lady Buchanan (usually simply known as Lady Constance even though she is now widowed), her twin brother Christopher Long, and her son Sir Peter Buchanan.  Lady Constance is quite the force of nature and likes to Get Things Done ~ nevertheless, she is very kind-hearted and is much liked and admired by the folk of Hazelton 😊


Sir Peter with his wife, Lady Elizabeth, and their 16 year old daughter Miranda.


Christopher never married or had any children.  He has always been very much a father figure to Peter and is very close to his nephew and his family.  Sadly Peter's own father was a very unpleasant man and despite Lady Constance's best efforts, he made Peter's childhood miserable ~ he was an equally unpleasant husband, too.  So much so that Peter was glad to be sent away to boarding school, especially as the school he was sent to was where Christopher had a long academic career teaching history and religious studies. 


Christopher and Lady Constance with their housekeeper, Beatrice Fisher.


And this, my lovelies, is the first house to be tackled in those Very Big Plans 😲  It will eventually be the new home of Lady Constance and Christopher.


But never fear, I have my trusty band of building contractors to assist 😉  You have also met the lads before but just to recap we have Albert Holland and Derek Landry, co-owners of Landry and Holland which is a building and general maintenance company, and Derek's son Graham, who they employ as a painter and decorator.

image from Clipart Library

You have no idea ~ yet! ~ of the work involved in this renovation so wish the lads and I luck 😄 


Friday, August 18, 2023

Chaos tamed.....


.....more or less 😉


Back in June I shared photos of what a mess my craft room was in yet again 😒


But look at this ~ clear surfaces LOL


I'll be honest, it took me bloody ages to work my way through everything, but I was determined to strike whilst my intentions to seriously downsize my craft supplies were still hot!  This little lot was just some of what I had stashed away in a tower of plastic drawers...


...I ended up only putting back a little of what had previously been languishing away in there ~ a mere two drawers' worth!

In the end I made the decision to use the craft room to concentrate on my dolls' house hobby.  There are a handful of other things like crochet, needle-felting, etc, that I shall continue to do but they are hobbies that I do in the house.  Because those supplies are also stored in the house I am mindful that I can't just keep adding to them willy-nilly ~ hence the stash-busting projects I have been (and still am!) working on.


I finished filling those drawers with lots of the little dolls' house bits and pieces.


Likewise, these lovely sturdy crates had been full to the brim of all sorts of crafting bits and bobs.  I went through them like a demon, making lots of Very Big Decisions and emptying them completely.  Of course, I now have a humungous amount of stuff to try to sell and also some to donate but it's far better to let someone else make use of it than having it all just sitting in my craft room taking up space ~ both physically and in my head 😉


I had loads of blue plastic crates (you can see some of them to the left of the bookshelves in the first photo) crammed with all the dolls' house bits and pieces I've collected over the years.  Of course, because I haven't got any of the houses that I've also collected finished (most haven't even been built yet 😳) the crates just kept filling up.  I had a ruthless sort out, going through all of them, and everything I thought I would make use of is now stored in those much more sturdy white crates.


Everything I decided I wouldn't make use of is now in this crate, waiting for me to try them on Ebay in due course.


Even the Peediekins were tidied up...


...and are now relaxing in the wooden sewing box above, which I've stored beneath my desk so they are easily to hand.

It's amazing how much happier I feel now that I've done all this.  As I say I do still have lots of things to sell and donate but I'm content to do all that at a leisurely pace over the coming months ~ yes, there is such a lot of it that I truly believe it will take months!  I guess most folk would say it's something that should have been done a long time ago, but I know that I had to be in the right place mentally and emotionally.  I'm so grateful to Lyndi for giving me that initial mental and physical helping hand, but must admit that I'm also just a teensy wee bit proud of myself for completing the task under my own steam 😊