Showing posts with label kitchen. Show all posts

Monday, October 28, 2024

Christmas in October

image from Clipart Library

Yup, it's that time again when the house smells deliciously Christmassy and the kitchen is steamy for days 😄

I did a really big supermarket shop the week of the great fuchsia massacre, with the intention of setting-to and getting the Christmas puddings made the day after the girls had done their stuff out in the garden.  And, for once, I actually got my arse in gear and did what I'd planned to do 😉  I was also full of good intentions to share this year's big cooking exercise sooner but to be honest I felt a bit sort of tired and "flat" last week.  I think all the work in the garden is catching up with me a tad, so apologies for last week's radio silence.

Anyhoo, better late than never, so here's the recipe for the Larkin Christmas Pudding ~ along with a smattering of photos for good measure.  Over the years I have refined and tweaked this recipe so instead of just pointing you in the direction of a previous post as usual, I thought it was high time I actually rewrote it!  

I should also point out that I had more puddings to make this year, so I bought double the amount of ingredients.  However I still followed the normal recipe, simply making it twice, as I don't have any containers large enough to hold all those ingredients to make double the amount in one go!  I should think it would also be no mean feat to stir double the amount of everything together 😳


340g/12oz sultanas
340g/12oz raisins
170g/6oz cherries, halved or quartered
227g/8oz finely chopped mixed candied peel
227g/8oz plain flour
1 level teaspoon ground ginger
1 level teaspoon mixed spice
1 level teaspoon nutmeg ~ freshly grated if possible
454g/1lb soft brown sugar
227g/8oz breadcrumbs
284g/10oz shredded suet ~ beef or vegetable, whichever you prefer
6 eggs, beaten
142ml/5fl oz stout, such as Guinness
142ml/5fl oz brandy
grated rind and juice of 1 orange
142ml/5fl oz milk (approximately)

Grease whatever size of pudding basins you would like your finished Christmas puddings to be.  This recipe will make enough to fill four, one pint, pudding basins each one of which will give about six servings.

Put all the dried fruit into a very large bowl, along with the stout, brandy, and the rind/juice of the orange.  Leave to one side.

Smells so delicious 😋


Sift the flour and spices into another large bowl, then stir in the sugar, breadcrumbs, and suet.  In a separate bowl, beat the eggs and mix in the stout, brandy, and orange juice; add to the dried fruit, mixing in well.

Now's the time to work those biceps and start adding the dry ingredients to the wet, three or four spoonfuls at a time, stirring well after each addition.  When you get towards the end of the dry ingredients you will have to make a judgement call on how much milk to add.  I find that this varies from year-to-year, depending on how absorbent the dry ingredients happen to be.  The mixture should be a soft dropping consistency. 


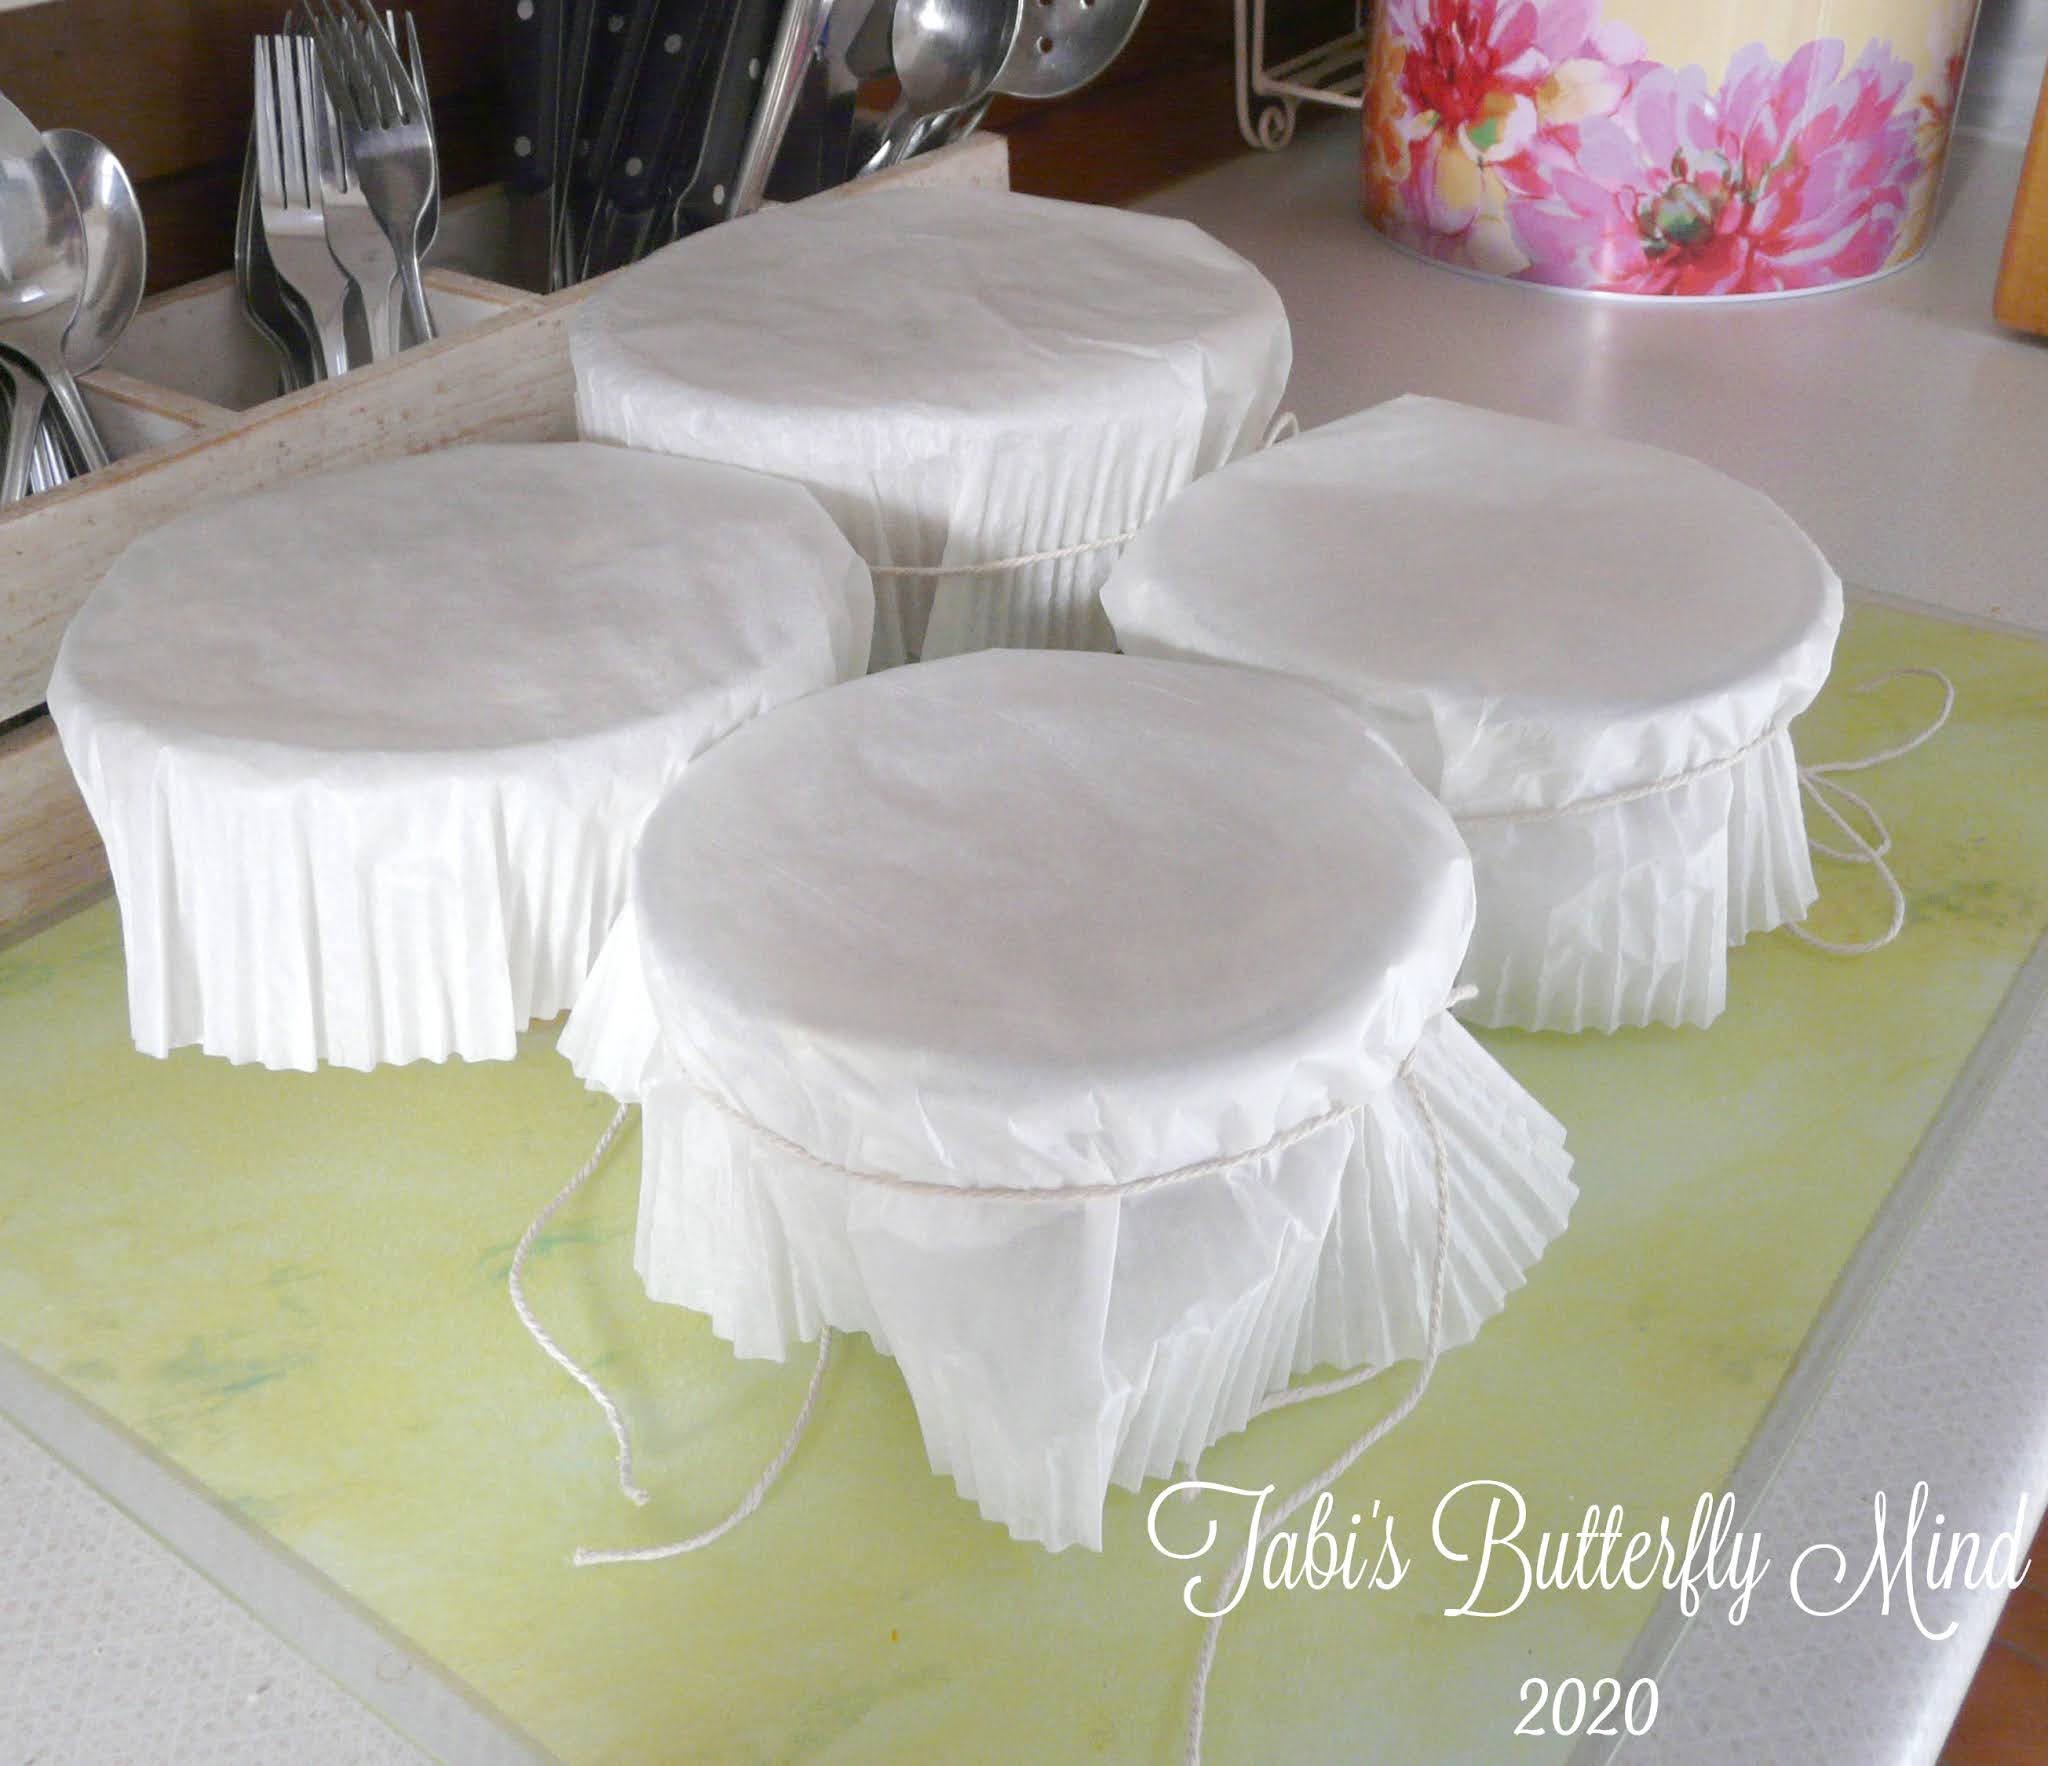
Divide the mixture between your well greased pudding basins.  This year I made one large pudding, along with a couple of smaller ones, from both batches of the recipe.  I used faff about with a doubled-up sheet of greaseproof paper, pleated in the centre, to cover the puddings.  A couple of years ago I had a brainwave and used cake tin liners instead ~ I know, genius, right 😏  Depending on what I have to hand, I then hold said liner/greaseproof paper in place with either string or an elastic band.  You use whichever method suits you best 😊


I also used to either use a pudding basin net or make a string handle to lift the puddings in and out of the steamer.  Now I just don my trusty rubber washing up gloves as I find it easier.  Just make sure to take care when removing the pudding as the basin will be very hot, and there will also be a lot of steam.

The old aluminium saucepan belonged to my paternal Grandma and it only ever gets used for steaming puddings.  I've had the steamer for donkey's years; the poor thing is a tad battered as it has been dropped a number of times over the years on the quarry tiled floor of our old kitchen!

So, bring the pan of water to the boil and place the pudding, in the steamer, on top; turn the water down to a low simmer.  Depending on the size of basin used, the puddings will take 5 to 7 hours to steam.  I steam my one pint puddings for 6 hours each, and the larger ones for the full 7.  To keep an eye on things, I set my timer for one hour at a time so that I remember to go and check on the water level in the saucepan.  Keep it topped up as necessary with boiling water from the kettle.


At the end of the steaming period, take the pudding from the steamer (remember to take care!) and discard the cake liner/greaseproof paper.  Cover with a clean tea-towel and leave on one side to cool.  When the pudding is totally cold remove it from the basin, wrap in a double sheet of greaseproof paper or baking parchment, then wrap again tightly in cooking foil.


The puddings should be stored in a cool place, or they could even be frozen if you'd prefer.  You'll have to remember to defrost them thoroughly before reheating.  With all the sugar and alcohol in them they should keep well in a cool place, though.  We have one at Christmas, obviously, but it's also a family tradition to have another at Easter.


When you are ready to eat your Christmas puddings, they can either be gently steamed for about 1 1/2 hours or reheated in the microwave ~ we take the latter route as it's simpler when there's so much other cooking going on.  I really can't tell you how long to reheat the pudding in the microwave as it's very much a trial-and-error process depending on your own particular machine.  I heat the pudding on full power for five minutes, then in short burst of a minute or so until it is thoroughly hot all the way through.

Serve your pudding with whatever your family likes best: rum/brandy butter, cream, a white (brandy or rum, perhaps) sauce, custard, ice-cream, etc.  We like to have ours with either cream or a white sauce flavoured with brandy.  I make the sauce very simply, like packet-mix custard ~ just substitute cornflour in place of the custard powder and add brandy to taste!

You can tweak this recipe to your heart's content with the proportions and varieties of dried fruit, so long as the total amount remains about the same.  You could also have a little less fruit and add nuts instead.  You can use rum instead of brandy if you would prefer ~ I use brandy as I'm really not keen on rum.  Make the recipe your own by using the fruit (and nuts) that you and your family like to eat.

Enjoy 😊 

Thursday, August 29, 2024

A little here, a little there


As well as spreading out tons of stone chippings and building flat-packed wardrobes, we have also been doing bits and pieces in various parts of the garden ~ little bites of that elephant 😉

I took a little time out, though, to take a couple of photos of the beautiful hips on two shrubs in this more shady border in the kitchen garden.  The photo above is a hypericum...


...and this is, obviously, a rose.  I'm pretty sure that it's Rosa Rugosa Alba but I really didn't fancy getting in amongst all those thorny stems to double-check 😯 


Our latest garden endeavours have mostly revolved around sorting out the old fruit cage area, as we've decided it needs to be totally overhauled.  The plan is to take out the central bed entirely, just leaving the two on either side.  We're going to set out a little seating area here in due course.  


Along with the weeds (!) in this bed there are a couple of holly shrubs, a couple of ferns, and three (I think) alchemilla mollis.  The alchemilla obviously like it here, judging by the growth they have put on!  I am going to relocate them to the back garden, so let's hope they will like their new homes as much.

Once the centre bed has been cleared out and dismantled, we are going to use the pieces of wood to make an extra layer on this right-hand bed ~ it will give us somewhere to put at least some of the soil so we don't end up having to make another soil mountain out the back 😄  I shall have to temporarily dig out and pot up the hollies and ferns in this bed whilst we do this so that it's easier to build up the new additional layer and, of course, put in the extra soil to fill it up.


I drastically cut back the blackcurrant bushes in this bed to make it easier to move them.  Just look at those weeds!


They've now gone in the back garden to make a short row of blackcurrant "hedge", in the bed with the bay tree.  The straggly-looking plant on the right is a piece of escallonia that I decided to leave where it was when I tidied this bed a couple of weeks back.  It doesn't look like much even now, I know, but is looking way better than it was before LOL


Only one of the redcurrants have produced much fruit...

...and we got almost two pounds from it!


The two redcurrants which were at the front are now in the bed with the fruit trees.

At the back of the old bed was one redcurrant which I bought as a standard, and a tiny piece that had broken off from one of the other bushes.  I've now put the standard redcurrant (which rather surprisingly didn't have as much root as I was expecting to be honest) in a large tub, which I've positioned in the kitchen courtyard between the bay tree and rosemary.

The tiny "bonus" piece was really too small to just plonk down in the garden, I felt, so I've potted it up to let it grow on.  Hopefully it'll be large enough to plant somewhere in the garden next year.    


Moving into the greenhouse just for a quick look, I'm pleased to report that the tomatoes are now fruiting rather nicely.  I noticed earlier in the week that one or two are also ripening up, so fingers crossed that we'll get a decent crop 🤞


And to round off this post, I thought I'd show you the photo of a red admiral butterfly I took last Friday.  There wasn't any sunshine so I think it must just have been having a little rest rather than soaking up the rays 😊

Tuesday, October 25, 2022

Soon be on their way...

As you may recall, Beverly and I made this year's Christmas puddings a couple of weeks back.  With the planned strikes by Royal Mail over the next few weeks, I thought it best to send the puds for family and friends down south a little earlier than I would have done otherwise.

Here's the first two, ready to wing their way to my sister and parents 😊  Unsurprisingly, I didn't have cardboard boxes of the right size in my stash so I've cut down the ones I did have to make them a tad smaller LOL


I came across a lovely pattern on Lucy's blog for a sweet little crocheted snowflake, so I thought I'd make some for this year's puddings.  Lucy said that she made hers using a pure wool double knit yarn and four different size hooks.  I used a 4.5mm hook and yarn from my stash (of course!), James C Brett Baby Shimmer, which I've had for a very long time; I last used it when I made some Christmas pudding baubles a couple of years ago, for the "cream" topping.


When I came to crochet the second snowflake, I made a little mistake in round three by omitting the last chain 2 in each of the worked sections ooopsies!  Thankfully it didn't affect the appearance of the finished snowflake 😉  I finished mine off with a hanging loop, simply made with a length of 12 chain stitches attached to the tip of one of the icicle points.   


I confess that I was too lazy to block my snowflakes but I think they still look very pretty 😊

Monday, October 17, 2022

Hot 'n' steamy!


The kitchen, that is, not me personally 😏

Beverly and I made this year's Christmas puddings last week.  It's always nice to spend time with her making the puddings ~ plus, of course, it saves my poor 'ole arms as she kindly "volunteers" to flex her 30-years younger muscles doing the heavyweight mixing 😉 We had to use two mixing bowls this time around, as my "giant economy size" bowl sadly bit the dust after developing a crack right across the base.  Still, I can't really complain too much as I bought it in a charity shop and did get a fair amount of use out of it 😄

 The photo above shows the first pudding after it's seven hour ~ I know, right 😮~ steaming.  I must confess that I'm a teensy bit concerned that I may not have added quite enough milk to the mix this year, so it's fingers crossed that the puds aren't too dry!

If you would like to try out the Larkin family Christmas pudding recipe, here's a link to the post from 2020 ~ enjoy!

Tuesday, February 15, 2022

Veggie February.....


.....didn't happen.  Well, to be more accurate, it did for the first week but then I let it fizzle out.  I think it was very much to do with the fact that I was relying on ready-made vegetarian dishes rather than scratch-cooking.  I had my gall-bladder removed a number of years ago and get some pain if I eat too much fat, so although I didn't think to look at the ingredients list of the things I bought, I rather suspect that most had a higher fat content than I would usually be consuming with my normal omnivorous way of eating.  I was starting to feel uncomfortable and in a certain amount of low-level pain, so went back to my normal diet.

Funnily enough, I have in the past found it easier (and more comfortable digestion-wise) to follow a vegan rather than simply vegetarian diet.  I guess I eat much more cheese and processed food on a vegetarian eating plan than I do on either a vegan or omnivorous diet.  Of course, it's much easier these days to find ready-made vegan meals than it was when I was following a vegan diet a few years ago.  Back then I had to make most of my meals from scratch and I'll admit that although I felt healthier for those two years than I had done for most of my adult life, I found it hard to be the only vegan in the family so gradually slipped back to my omnivorous diet!

The interesting thing, though, is that Adrian (a proper meat-and-two-veg ~ with potatoes counting as one of the two veggies 😉 ~ man) has suggested we try to have a couple of vegetarian meals each week ~ totally amazing!  So for now, at least, I'm back to my omnivorous diet ~ with plans to spend some delightful hours reading through my small library of cookery books for yummy made-from-scratch vegetarian meals we will both love 😊

Friday, December 11, 2020

Kate & Sidney pudding...

 ...aka steak and kidney pudding 😉

I've made plenty of steak and kidney pies over the years but I kid-you-not, it must be over 30 years since I last made a pudding. For some reason we seem to have rather a lot of packets of suet in the cupboard at the moment, so I thought it would be a good idea to use some of it up! 

I stewed the meat on Tuesday, ready to make the pudding on Wednesday.  Suet pastry is simple enough to make, but I still managed to add a little too much water.  Thankfully, it's a very forgiving pastry so a good dusting of flour on the board and my hands brought it all back together again nicely.

The pudding gently steamed away for a couple of hours or so.....


and we had a portion each with a handful of chips and a pile of green beans.

Adrian was a very happy bunny as it's one of his favourite meals ~ and it was very tasty, even if I do say so myself 😋  

Monday, December 7, 2020

Did you succumb.....

.....to the Black Friday hype?  Usually it's an event that passes right over the top of my head but this year it just happened to coincide with me needing to top up my supplies of...


 ...loose-leaf Lady Grey tea, which I've been drinking since my conversion from tea-bags last year.  As it's only me who drinks the stuff I usually only buy one caddy from Twinings at a time but for Black Friday they had a discount of 20% ~ definitely not to be sniffed at, eh?  So, as you do, I bought myself.....four caddies!  Spending over £35 meant free delivery, too 😉

I've managed to squeeze all the caddies into my larder cupboard and am looking forward to many delicious cups of Lady Grey over the weeks (months!) to come 🍵   

Thursday, November 5, 2020

A pudding experiment!

 During the early part of lockdown I used up the last of our pudding rice and couldn't get any more in our local Tesco, which was a tad annoying.  Anyhoo, I had a brainwave and got some arborio rice to try out as a substitute ~ after all it's short-grain like pudding rice is.  And then I promptly forgot all about making rice puds over the summer 😄  Fast-forward to Christmas Pudding Sunday and I found myself with fresh milk to use up from the leftover ingredients ~ finally time for that rice pudding experiment 😉


As you can see the arborio behaved just like the pudding rice does.  I got to thinking about what exactly "pudding rice" is, so did a quick search on Google and this is what the good 'ole BBC has to say on the matter:

"This is not a specific type of rice, but a generic description for short-grained white rice used for making rice pudding.  The term is rarely used outside England.  Whichever rice you use, the important thing is that it should give a soft, creamy, slightly sticky result."

So now we know!  If you too fancy a bowl of comforting, rib-sticking, rice pudding here's the very simple recipe I've used for donkey's years, which gives 4-6 servings:

5oz/140g short-grain rice, such as pudding or arborio rice
3oz/90g sugar
2 pints/1 litre milk
1 teaspoon vanilla extract

Place all the ingredients, except the vanilla, in a saucepan and bring to the boil.  Turn down to a gentle simmer and cook for about 25-30 minutes, stirring from time-to-time to prevent the rice from sticking to the bottom of the pan.  When the rice is cooked, remove the pan from the heat and stir in the vanilla extract.

Monday, November 2, 2020

It's that time again!

I made the Christmas puddings yesterday ~ sadly, though, no "Mummy's little helper" this year.  Still, I had Radio 3 for company so it wasn't all bad 😉  So here is my annual post for the Larkin Christmas pudding recipe:

12 oz/340g sultanas
12 oz/340g raisins
6 oz/170g glace cherries, halved or quartered
8 oz/227g finely chopped mixed candied peel
8 oz/227g plain flour
1 level teaspoon ground ginger
1 level teaspoon mixed spice
1 level teaspoon nutmeg ~ freshly grated if possible
1 lb/454g soft brown sugar
8 oz/227g breadcrumbs
10 oz/284g shredded suet ~ beef or vegetable, whichever you prefer
6 eggs
5 fl oz/142ml barley wine or stout
5 fl/142ml oz brandy
grated rind and juice of 1 orange
1/2 pint/284ml milk (approximately)

This recipe makes enough mixture to generously fill four 1 pint (5ooml) pudding basins, each one of which will give about six servings; I usually use three 1 pint basins and one 1 1/2 pint (900ml). Grease whatever size of pudding basins you would like your finished Christmas puddings to be. 

Sift the flour and spices into a very large mixing bowl, stir in the sugar, breadcrumbs and suet, then add the dried fruit and grated orange rind.


Beat the eggs and add to them the barley wine/stout, brandy and orange juice.  Stir this into the dry ingredients and mix well, adding enough milk to give the mixture a soft dropping consistency if necessary. 


Put the mixture into your well greased pudding basins.  Cover each one with a doubled-up sheet of lightly greased greaseproof paper or baking parchment, making a pleat in the centre to allow for expansion whilst the pudding is steaming.  Hold the paper in place with string or an elastic band.  This year though, as you can see, I had a brainwave and thought it would be much easier to use baking parchment cake tin liners ~ I know, genius right 😄


  I use a pudding basin net to make life easier when lifting the basins in and out of the steamer, but if you haven't got one simply use string to make a handle.  Whatever you use, do be very careful when taking the puddings out of the steamer as they will be very hot!


Bring a pan of water to the boil and place the pudding, in a steamer, on top; turn the water down to a low simmer. The puddings will take 6-7 hours to steam, depending on the size of basin you use.  I steam the one pint puddings for 6 hours each, and the larger pudding for 7 hours.  I usually set my timer for one-hour-at-a-time so that I remember to watch the level of water in the pan, keeping it topped it up as necessary with boiling water from the kettle. 

This old saucepan belonged to my Grandma and I only ever use it for steaming puddings ~ each time I use it, though, I am reminded of her 😊 I've had the steamer forever; it's a tad battered these days as it was dropped on the quarry tiled kitchen floor of our old house a number of times over the years!


At the end of the steaming period, take the pudding from the steamer and remove the greaseproof paper. Leave it in the bowl, cover with a clean tea-towel and leave on one side to cool. 


When the pudding is totally cold, remove it from the basin and wrap in a fresh double sheet of greaseproof paper and then wrap tightly in cooking foil. Store the puddings in a cool, dry place.

I try to make my puddings towards the end of October/beginning of November and it's a family tradition to save one to have one at Easter.  They should keep well, with all that sugar and alcohol in them!  On occasion, though, I've been somewhat less organised and haven't made them until close-on Christmas Day ~ they still taste delicious 😋 

 When it's time to eat your yummy Christmas pud, you can either gently steam it for about 1 1/2 hours or reheat in the microwave.  I'm afraid I can't really tell you how long to heat the pudding in the microwave; it's very much a trial-and-error process as each machine seems to heat differently!  I just tend to heat ours on full in 3-4 minute bursts until it is good and hot all the way through.

 Serve your pudding with whatever your family likes best: rum or brandy butter/sauce, custard, cream, ice cream, etc.  My husband likes to have cream with his but I prefer a brandy sauce which I make very simply like custard ~ just substitute cornflour for the custard powder and add brandy to taste!

I really hope you enjoy this recipe.  You can tweak it as you wish on the proportions and varieties of dried fruit, just keep the total amount about the same.  You could have a little less fruit and add nuts.  You could also use rum instead of brandy ~ I use brandy as I'm not that keen on rum.  Make the recipe your own by using the fruit (and nuts, if you wish) that you and your family like to eat 😊

Tuesday, October 27, 2020

Tired of thinking about it


"It" being dieting/weight-loss/healthy eating plans/whatever-the-hell-you-want-to-call-it.  I am 59 years old and thoughts of needing to lose weight have been rattling around in my head for over 40 of those years.  I've been on countless weight-loss regimes since my very early twenties, none of which I have stuck with for any length of time and consequently, of course, none of which have had lasting effects.  And looking at photographs taken of me in those early days, I wasn't particularly overweight anyway!  All I've managed to achieve over the years is to make myself feel pretty miserable around food for much of the time...and when I am unhappy I comfort-eat.  My head has been stuffed full of guilt with feelings of being a failure and hot on the heels of that comes the feeling of worthlessness ~ which leads to the comfort-eating cycle yet again.  I am tired of the whole thing.....so I don't think I'm going to try another "weight-loss" regime for the foreseeable future.  I've got far fewer years ahead of me than behind and I think I've spent more than enough time fretting about "dieting".

All this hasn't come out of nowhere, it's something that has been on my mind a lot over recent months.  I hold up my hands and admit that I've gone through periods when my diet ~ using the true definition of the word as opposed to a slimming campaign ~ has been pretty dire.  To be fair to my parents, we ate well at home.  I think the rot set in when I married my first husband who was a very fussy and unadventurous eater.  It was easier for me to just fall in with his eating habits and I suppose I was too lazy to cook separate meals.  When Adrian and I got together I discovered that although he likes a broader range of foods than the ex, he still isn't keen on much in the vegetable line and really prefers a meat/fish-and-potato diet, with a little portion of a select few veggies thrown in to show willing!  So, as I did with the ex, over the years we've been together I have mostly fallen in with his likes.

I was thinking about all this again as I was re-setting the old clock I have that belonged to my Grandma.  The hands have to be moved manually all the way round the clock to get to the correct time, which is of course 11 circuits, and since it chimes on all the quarters it's a bit of a long-winded process in the autumn when BST ends!  So there I was, sitting there just twiddling those clock hands, and thinking about meals at Grandma's house when my sister and I had holidays with her during the 1960s/early 1970s.....

She made virtually everything from scratch and ate wholesome meals with lots of local ingredients from the shops in the village.  She ate breakfast, dinner, tea and supper, but none of her meals were the mega-portions we have a tendency to snaffle today.  She ate cakes and pastries but they were homemade, small and she only ate one at tea-time ~ no snacking on them throughout the day!  Grandma was a very active lady; she walked or cycled most of her life (she never had a car), worked in her garden and kept her house spotless.  She wasn't just physically active, she kept her brain busy too with all the sewing, knitting, reading, etc, that she liked  to occupy herself with.

I really believe that food was different then ~ I'm sure it's not just "rose-tinted spectacles syndrome".  I don't remember eating ready meals of any description until I was in my early teens; my Mum, like Grandma, mostly cooked from scratch other than the occasional fish-and-chip supper.  Grandma didn't even have a fridge when I was a child; I remember how cool her pantry always was.  She kept bottles of milk in a bucket of cold water and walked up to the village shops most days to buy fresh food.  Meat came from the butcher, wet fish from the fish and chip shop, bread from the village baker, vegetables and fruit from the greengrocer. 


At home we had "proper" dinners each day too, quite often with a pudding, and a traditional roast on Sundays (actually, that's something that Adrian and I still usually have on Sundays).  Breakfast would be cereals and toast or perhaps a boiled egg with toast soldiers, and sometimes a traditional English fried breakfast on Saturday or Sunday.


For tea (or at lunchtime if we were having our main meal in the evening) we would have sandwiches ~ cheese, ham, tuna or egg mashed up with salad cream.  Or perhaps it would be baked beans, tinned sardines or scrambled eggs on toast ~ plus a piece of homemade cake.


I didn't grow up in a village, we lived on the outskirts of Norwich for most of my childhood, so I guess there was access to a wider variety of shops in the city although there was still a group of local shops at the bottom of our road.  There was a little supermarket of sorts in Grandma's village where she bought packet and tinned goods (I remember one of our tea-time treats was tinned peach slices with evaporated milk and a slice of bread and butter!), and household sundries.

The main thing I remember, though, is really what I don't remember: being served large portions.  And yet I can say hand on heart that I don't recall ever leaving the table still feeling hungry.  We didn't eat until we were stuffed, we simply ate enough to satisfy our hunger.  I can hear to this day Grandma saying "I've had quite sufficient, thank you" 😉


    There wasn't much eating between meals, either; if we did want something we would have been offered a piece of fruit.  That's not to say that we never had any sweets, chocolate, shop-bought biscuits or an ice-cream ~ things like that were regarded as treats.


I should imagine that most folk of my generation grew up eating in a similar fashion; our parents and grandparents would almost certainly have eaten those kind of meals, too. What went wrong then? Back then, it was "real" food; no one would have even heard of low fat this/low carbohydrate that/full of fibre the other. People just ate food! What so many of us eat nowadays seems so far removed from good, basic, wholesome food, it's more like something concocted in a laboratory. How can it possibly sustain and nourish our bodies ~ and our minds too, for that matter?

I guess the only logical step is to cook from scratch, using good old-fashioned basic ingredients, as often as possible. I have enough cookery books to open my own flippin' library, some of which belonged to Grandma including her battered old notebook with her own handwritten recipes 😊 Unlike Grandma, I have the convenience of a freezer which makes it so much easier to buy meat and fish on a weekly (or longer) basis. I can also do batch-cooking ~ after all it's no more bother to make, say, a big pan of stew instead of enough for just one meal, and freeze half for those days when we are going to be busy and won't want to be spending ages in the kitchen.


I'm not suggesting for one minute that if I start cooking from scratch my excess weight will just magically melt away. For the first time in many years that's not my primary objective. I just feel that it's time to feed my body, mind ~ and yes, my soul too ~ some good wholesome, nourishing food.

Grandma with my little sister and I sometime in the mid 1960s

I'm rather looking forward to falling back in love with cooking and baking again, and trying out some new-to-me "old" recipes. Be warned, though, I may feel the need to share my upcoming kitchen adventures 😃

Saturday, February 29, 2020

Kitchen strangeness!


Now that the washing machine and tumble-dryer have been moved to the utility room we have a space in the kitchen.  For reasons best known to themselves, the previous owners decided that this wall should have horizontal cladding fixed over the (probably) original vertical cladding.  The old grease splatters on the wall and cabinet sides attest to the fact that they had their cooker here ~ we had the very old cooker socket replaced last year.

They also made a cooker hood of sorts ~ well, I guess that was the general idea they were aiming for!  Basically it was chipboard covered with a sheet of copper and it looked decidedly ugly.  So down it came, to reveal.....


.....all these holes!  And yes, that is indeed daylight you can see 😕  The holes line up with the air-vent outside.  There was obviously some kind of extractor fan in place originally ~ the outer fan blades are still visible in the cavity!


I suppose it was too much like hard work to remove all the workings and make good the wall, so up went the "cooker hood".  Or perhaps they felt the holes would be good ventilation for cooking smells???


Anyhoo, Adrian has now filled the holes as best he can (he still needs to rub down the filler), which has cut down the draughts quite considerably LOL

It looks a mess right now, but we are planning to give the kitchen a bit of a spruce-up at some point this year.  It's going to be a looooong time before we can have the kitchen stripped out (like the downstairs bathroom) and refitted.  As you can see in this old post, the kitchen is not terribly attractive but it is functional.  Like the rest of the house it has suffered from years of dampness, particularly in the cabinets on this "cooker hood" side of the room.  I'm planning to revamp these cabinets and I'm still mulling over what direction to go with them.  I'll share ideas and photos in due course 😊

At the moment I can't quite decide whether to simply paint over the wallpaper on the other walls or strip if off first.  It appears that these other walls have had hardboard or plywood fitted over the original cladding.  Decisions, decisions!  I'd also quite like to have a new ceiling light fitted, one of those spotlight bars would be a good idea I think.  We currently have a single light, which isn't even in the centre of the room and is less than ideal as I'm sure you can imagine!

We don't want to be throwing more money at an interim kitchen refurbishment than we have to, but it would definitely be a more cheerful room if we can tidy it up somewhat 😉