Thursday, October 31, 2024

How amazing ~ absolutely nothing to do with the garden 😄

image from Clipart Library

I mentioned way back in the mists of time that we were building flat-packed wardrobes for our bedroom, and it dawned on me the other day that I hadn't updated you any further on our progress 😏  

In our previous home we had built-in wardrobes in our bedroom, so when we moved into St Abbs we had nothing to hang our clothes in.  We were loath to fork out for "decent" wardrobes as we knew that at some point, when we renovated the bedroom, we were planning to once again have built-in cupboards.  On the other hand, building cheaper flat-packed furniture is something that we just aren't very good at!  In the end we decided to just get a couple of clothes-rails to hang everything on.  

Of course, back then we hadn't realised just how long it was going to take us to work our way round the house; six years later the bedroom was no nearer to being renovated and our clothes were still hanging on those rails.  It really wasn't an ideal situation as they get remarkably dusty just hanging there, so in the end we decided to bite the bullet and go for some flat-packed furniture after all since we have absolutely no idea when we'll be getting the bedroom sorted out😳    


The room is a pretty decent size but as it's built partly into the roof, it makes it a little more difficult to fit wardrobes into.  Hopefully when we finally get the room renovated having built-in furniture will make good use of the space.


As I mentioned previously we did have some issues with the wardrobes but eventually that was sorted out and we were able to get them built.  It was a somewhat frustrating and annoying task, and we didn't make a brilliant job of it, but at least everything is now behind closed doors instead of gathering layers of dust!

As you can see we also built a couple of smaller cupboards for other stuff.  We weren't able to find suitable matching pieces, unfortunately, so have had to make do with what was right for what we wanted to store.


This, as you can see, is my shoe collection.  Now I realise that compared to some folk it really is a pretty modest collection.....but for someone who tends to default to Crocs most of the time, I definitely have way more pairs of assorted footwear than I actually need 😄


Sorting them out was another of those little jobs that I just kept putting off tackling but in the end it really didn't take long at all, and I whittled the collection down to these 😏

Since my high blood pressure medication was changed my feet and ankles are much less swollen than they were, and so I found that I could actually fit into all of them except for one pair!  Three pairs were actually too large and another two were simply uncomfortable, so I may try to sell them as they have never been worn. 


Ta-daa!  All put away, looking very neat and tidy even if I do say so myself 😉


Once I'd got that little job done I decided to move the boys off our bed to sit on top of the cupboard.  The cushion is there to support poor 'ole Fred (the dapper doggy in the snazzy blue leggings 😍) as his head is flopping all over the place again.  He really could do with his stuffing being topped up again in his neck ~ I'll try to get round to sorting the poor little bugger out sometime over the coming winter months 😊

Tuesday, October 29, 2024

Still chomping at that elephant!

image from Clipart Library

Despite last week's radio silence from yours truly, we were still plugging away at the work to be done in the garden ~ it's never-bloody-ending 😳 


Adrian has made great progress in our new little patio area in the front garden, and as you can see the raised bed on the left has now been extended.  Incredibly it has eaten all of the soil mountain, plus half a dozen bags of not-quite-fully-composted compost that had to be emptied out from our bins when we topped up all the stone chippings earlier in the year.  The soil from the mountain was extremely wet and claggy, which made the job much more difficult and tiring.

As always, I'm behind with photos.  The bed on the right is now completely empty, and Adrian has also since used some of the soil from it to top up the "new" bed.  Now that we can see the potential space we've decided to completely dismantle the bed on the right, to make the seating area larger.  It will be nice to be able to position the garden furniture against the tall walls, making the seating area more sheltered and cosy.


We'll be left with more soil again, of course, but we've already been dipping into it to top-up other parts of the garden, so I don't think it will be hanging around for long!  The leftover wooden boards won't go to waste, either, as Adrian wants to use them to top off the edging of the borders over in the ornamental garden.  


Back in August I told you about the trials and tribulations of this year's strawberry crop.  I mentioned that I was intending to move them to a new location, and plant them in a different way.  This, my lovelies, is the idea I had to hopefully make the bed easier to manage.  The pots are quite large, certainly big enough to set the strawberry supports I got from Marshalls in.   I managed to get half the new bed done but it wasn't as easy as I had hoped it would be, as the soil was pretty wet and heavy 😒  As usual it took far longer than I had anticipated just to get half the bed done but luckily for me Adrian volunteered to tackle the other half, which he finished today, although I haven't taken photos yet.

I've been working round the other kitchen garden beds over the last week or so, keeping the weeds at bay before it becomes too unpleasant to work out there.  As you can see, I made a start on the other half of the new strawberry bed.  I made of a mess of it, to be honest, as I somehow managed to dig too far down in the soil when I was putting in the pots 😳 That's probably why Adrian took pity on me and volunteered to do it 😄


What's that saying?  "One year's seeds, seven years weeds"?  The asparagus bed was developing yet another fine crop of the buggers, but thankfully it didn't take long to pull the blighters out.


Looks a tad odd, I know, but there's method in my madness 😉 I treated myself to a selection of tulips and narcissus from J. Parkers to grow as cut flowers.  I planted them in pond plant baskets to make them easier to remove once they have finished flowering.  I'll then tuck them away, still in the baskets, in a suitable spot in the back garden until I replant them again next autumn.  I may well plant at least some of them into the borders, though, and buy some different varieties to grow for the spring of 2026.  Of course, it sounds good in theory ~ we'll just have to wait and see what it pans out like in practice!

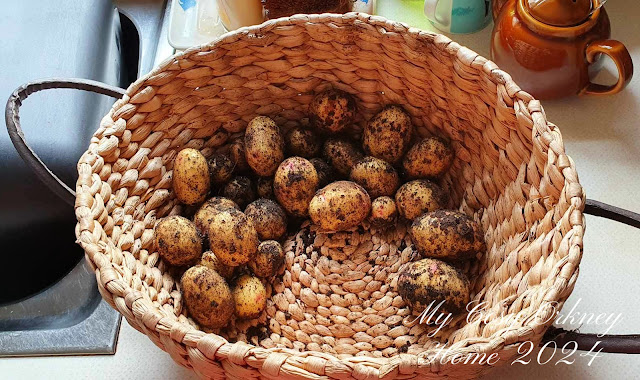
And to finish off, I dug up the last of this year's potato crop this morning.  Whilst they have been very tasty, the potatoes definitely haven't grown as large this year.  Hopefully next year's crop will be better 😊


Monday, October 28, 2024

Christmas in October

image from Clipart Library

Yup, it's that time again when the house smells deliciously Christmassy and the kitchen is steamy for days 😄

I did a really big supermarket shop the week of the great fuchsia massacre, with the intention of setting-to and getting the Christmas puddings made the day after the girls had done their stuff out in the garden.  And, for once, I actually got my arse in gear and did what I'd planned to do 😉  I was also full of good intentions to share this year's big cooking exercise sooner but to be honest I felt a bit sort of tired and "flat" last week.  I think all the work in the garden is catching up with me a tad, so apologies for last week's radio silence.

Anyhoo, better late than never, so here's the recipe for the Larkin Christmas Pudding ~ along with a smattering of photos for good measure.  Over the years I have refined and tweaked this recipe so instead of just pointing you in the direction of a previous post as usual, I thought it was high time I actually rewrote it!  

I should also point out that I had more puddings to make this year, so I bought double the amount of ingredients.  However I still followed the normal recipe, simply making it twice, as I don't have any containers large enough to hold all those ingredients to make double the amount in one go!  I should think it would also be no mean feat to stir double the amount of everything together 😳


340g/12oz sultanas
340g/12oz raisins
170g/6oz cherries, halved or quartered
227g/8oz finely chopped mixed candied peel
227g/8oz plain flour
1 level teaspoon ground ginger
1 level teaspoon mixed spice
1 level teaspoon nutmeg ~ freshly grated if possible
454g/1lb soft brown sugar
227g/8oz breadcrumbs
284g/10oz shredded suet ~ beef or vegetable, whichever you prefer
6 eggs, beaten
142ml/5fl oz stout, such as Guinness
142ml/5fl oz brandy
grated rind and juice of 1 orange
142ml/5fl oz milk (approximately)

Grease whatever size of pudding basins you would like your finished Christmas puddings to be.  This recipe will make enough to fill four, one pint, pudding basins each one of which will give about six servings.

Put all the dried fruit into a very large bowl, along with the stout, brandy, and the rind/juice of the orange.  Leave to one side.

Smells so delicious 😋


Sift the flour and spices into another large bowl, then stir in the sugar, breadcrumbs, and suet.  In a separate bowl, beat the eggs and mix in the stout, brandy, and orange juice; add to the dried fruit, mixing in well.

Now's the time to work those biceps and start adding the dry ingredients to the wet, three or four spoonfuls at a time, stirring well after each addition.  When you get towards the end of the dry ingredients you will have to make a judgement call on how much milk to add.  I find that this varies from year-to-year, depending on how absorbent the dry ingredients happen to be.  The mixture should be a soft dropping consistency. 


Divide the mixture between your well greased pudding basins.  This year I made one large pudding, along with a couple of smaller ones, from both batches of the recipe.  I used faff about with a doubled-up sheet of greaseproof paper, pleated in the centre, to cover the puddings.  A couple of years ago I had a brainwave and used cake tin liners instead ~ I know, genius, right 😏  Depending on what I have to hand, I then hold said liner/greaseproof paper in place with either string or an elastic band.  You use whichever method suits you best 😊


I also used to either use a pudding basin net or make a string handle to lift the puddings in and out of the steamer.  Now I just don my trusty rubber washing up gloves as I find it easier.  Just make sure to take care when removing the pudding as the basin will be very hot, and there will also be a lot of steam.

The old aluminium saucepan belonged to my paternal Grandma and it only ever gets used for steaming puddings.  I've had the steamer for donkey's years; the poor thing is a tad battered as it has been dropped a number of times over the years on the quarry tiled floor of our old kitchen!

So, bring the pan of water to the boil and place the pudding, in the steamer, on top; turn the water down to a low simmer.  Depending on the size of basin used, the puddings will take 5 to 7 hours to steam.  I steam my one pint puddings for 6 hours each, and the larger ones for the full 7.  To keep an eye on things, I set my timer for one hour at a time so that I remember to go and check on the water level in the saucepan.  Keep it topped up as necessary with boiling water from the kettle.


At the end of the steaming period, take the pudding from the steamer (remember to take care!) and discard the cake liner/greaseproof paper.  Cover with a clean tea-towel and leave on one side to cool.  When the pudding is totally cold remove it from the basin, wrap in a double sheet of greaseproof paper or baking parchment, then wrap again tightly in cooking foil.


The puddings should be stored in a cool place, or they could even be frozen if you'd prefer.  You'll have to remember to defrost them thoroughly before reheating.  With all the sugar and alcohol in them they should keep well in a cool place, though.  We have one at Christmas, obviously, but it's also a family tradition to have another at Easter.


When you are ready to eat your Christmas puddings, they can either be gently steamed for about 1 1/2 hours or reheated in the microwave ~ we take the latter route as it's simpler when there's so much other cooking going on.  I really can't tell you how long to reheat the pudding in the microwave as it's very much a trial-and-error process depending on your own particular machine.  I heat the pudding on full power for five minutes, then in short burst of a minute or so until it is thoroughly hot all the way through.

Serve your pudding with whatever your family likes best: rum/brandy butter, cream, a white (brandy or rum, perhaps) sauce, custard, ice-cream, etc.  We like to have ours with either cream or a white sauce flavoured with brandy.  I make the sauce very simply, like packet-mix custard ~ just substitute cornflour in place of the custard powder and add brandy to taste!

You can tweak this recipe to your heart's content with the proportions and varieties of dried fruit, so long as the total amount remains about the same.  You could also have a little less fruit and add nuts instead.  You can use rum instead of brandy if you would prefer ~ I use brandy as I'm really not keen on rum.  Make the recipe your own by using the fruit (and nuts) that you and your family like to eat.

Enjoy 😊 

Sunday, October 27, 2024

Peace...

www.allposters.co.uk

Father, Mother, God,

Thank you for your presence during the hard and mean days.
For then we have you to lean upon.

Thank you for your presence during the bright and sunny days.
For then we can share that which we have with those who have less.

And thank you for your presence during the Holy Days.
For then we are able to celebrate you and our families and our friends

For those who have no voice, we ask you to speak.

For those who feel unworthy, we ask you to pour your love out in waterfalls of tenderness.

For those who live in pain, we ask you to bathe them in the river of your healing.

For those who are lonely, we ask you to keep them company.

For those who are depressed, we ask you to shower upon them the light of hope.

Dear Creator, You, the borderless sea of substance, we ask you to give to all the world that which we need most.....PEACE.

Maya Angelou

(4th April 1928 - 28th May 2014)   

Sunday, October 20, 2024

Peace...

www.allposters.co.uk

Father, Mother, God,

Thank you for your presence during the hard and mean days.
For then we have you to lean upon.

Thank you for your presence during the bright and sunny days.
For then we can share that which we have with those who have less.

And thank you for your presence during the Holy Days.
For then we are able to celebrate you and our families and our friends

For those who have no voice, we ask you to speak.

For those who feel unworthy, we ask you to pour your love out in waterfalls of tenderness.

For those who live in pain, we ask you to bathe them in the river of your healing.

For those who are lonely, we ask you to keep them company.

For those who are depressed, we ask you to shower upon them the light of hope.

Dear Creator, You, the borderless sea of substance, we ask you to give to all the world that which we need most.....PEACE.

Maya Angelou

(4th April 1928 - 28th May 2014)   

Thursday, October 17, 2024

What a difference...

a pair of young women wielding various "tools of destruction" can make in a morning😄

You may recall my sad lament regarding how vigorously the fuchsia beside the tiny little nature pool had grown.  Like the rest of the garden it had become totally overgrown over the last 18 months or so, but I have to admit that it wasn't an easy shrub to keep under control at the best of times.  So Adrian and I asked Beverly and Lyndi if they could help us do something with it.  They are both quite keen on a spot of demolition and were kind enough to come over last weekend to sort it out ~ and all we had to do was feed and water the pair of 'em😉


Ta-daa!  What a huge difference removing it has made!  There is obviously a lot of work yet to be done, but we won't be tackling it until next year as we are still plugging away at the rest of the garden.  I expect we will end up deconstructing the area and starting again, certainly in the vicinity of the pool at any rate.  I am considering taking out the plants on the right-hand side and extending the size of the pool to make a tiny marshy area.

I'm trying to rein-in my butterfly mind, though, as it's going to be a number of months before we can make a start on this new project!  I was thinking about it in the shower the other day and obviously not concentrating on what I was picking up ~ I ended up washing with my "detoxifying" seaweed shampoo instead of  the "soothing and nourishing" coconut body wash😳


The deconstruction/reconstruction in the old fruit cage area is still progressing albeit a tad slowly this week as the weather is rather mixed.  Whilst Adrian was working on the bed at the front I got the two holly bushes dug out from the one at the back, and moved them to fill the gap in the hedge border.

Good news, by the way, on the hedge border front.  Our neighbours have started a massive clearing out exercise of their thorny/prickly shrubs, so hopefully I won't have to contend with them encroaching into our garden in the future 😊 


As well as the holly bushes I also dug out the two ferns that were in the same bed, along with two from the border that runs across the garden in front of the dining room.  Before I realised just how hard it would be to transplant, I had thought about moving the fuchsia into this bed.  Now that our neighbours are having this clear out in their garden and I don't have to try to "fight back" with my own big shrubs, I felt it would be much better to make this into a fern bed instead.  There really are four ferns in the bed, it's just that two are very small ~ probably because they were being rather smothered by weeds!  I have two more in the border alongside the path that runs from the front gate, and I'll hopefully get them moved into the bed soon.

I can't quite believe how long it took me to move these six plants ~ I was out there beavering away for about three bloody hours!  The couple that had been in the bed with the holly bushes were relatively easy to dig out, but it was hard going getting the other two out of that overgrown border 😒


And to finish off, here's a cute scene in the central raised bed in the back patio garden: a little slice of life imitating art 👏

Sunday, October 13, 2024

Peace...

www.allposters.co.uk

Father, Mother, God,

Thank you for your presence during the hard and mean days.
For then we have you to lean upon.

Thank you for your presence during the bright and sunny days.
For then we can share that which we have with those who have less.

And thank you for your presence during the Holy Days.
For then we are able to celebrate you and our families and our friends

For those who have no voice, we ask you to speak.

For those who feel unworthy, we ask you to pour your love out in waterfalls of tenderness.

For those who live in pain, we ask you to bathe them in the river of your healing.

For those who are lonely, we ask you to keep them company.

For those who are depressed, we ask you to shower upon them the light of hope.

Dear Creator, You, the borderless sea of substance, we ask you to give to all the world that which we need most.....PEACE.

Maya Angelou

(4th April 1928 - 28th May 2014)   

Friday, October 11, 2024

Stacking up


After a few hours working in the garden I really don't feel up to doing anything that could possibly turn out to be even a teensy wee bit strenuous ~ so as you can imagine my decidedly patchy housework routine has gone completely out the window yet again 😄


That's not to say, though, that I've just been vegetating in front of the TV of an evening 😉 I have in fact been plugging away at the Christmas gift blanket I started back in August.  I estimate that I'm about two-thirds of the way through the body of the blanket but I confess that the making of it does seem to be crawling along somewhat *sigh*  It's also not as wide as the bonus blanket, and I don't really know why.  I can only surmise that I made a longer starting chain for the BB and/or used a slightly larger hook perhaps?  This is, of course, a good lesson on why I should keep proper records of the things I make for future reference!  To bring it up more to the dimensions of the BB, I guess I'll just have to make a wider border.

It is a very pretty blanket, though, and I am pleased with how the colour combination has turned out, but I rather think it will be quite some time before I tackle another interlocking block stitch pattern 😄


To make matters worse, my butterfly mind keeps flitting over to the latest blanket Beverly has asked me to make: a baby blanket for her friend.  Said baby is due in February, I believe, so provided I get a wiggle on with the Christmas gift blanket I should be able to leave myself enough time to make this one.

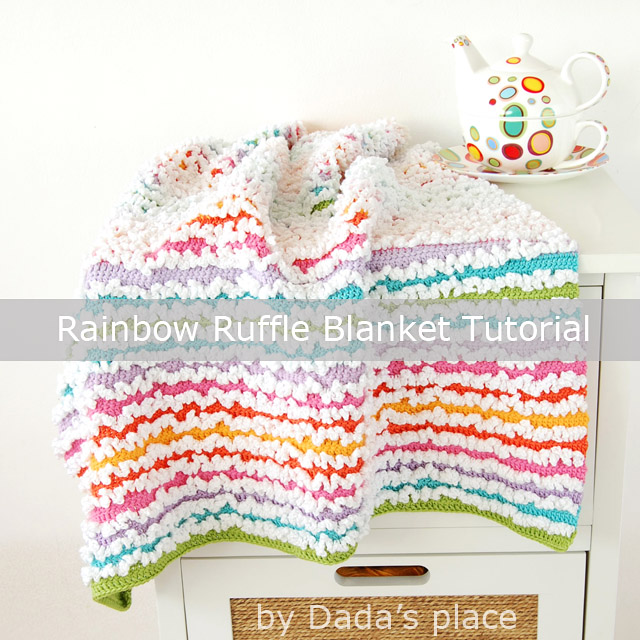
pattern from Dada's Place

This is the pattern that Beverly has chosen, the Rainbow Ruffle Blanket by Dada's Place.  Dragana has lots of lovely, free, patterns on her blog as well as many more in her shop.  I came across this particular pattern quite some time ago and it's been sitting in my stash of patterns waiting to be made since then.


Beverly decided to keep the colour palette very simple and neutral rather than the rainbow colours used in the pattern, and also to have the blanket made a little larger.  I got the yarn from my usual go-to supplier, Wool Warehouse.  It's King Cole Cottonsoft DK which, as the name suggests, is a 100% cotton yarn and comes in 100g balls.  The main body of the blanket will be in the lovely pale green shade, Sage, with the ruffles in Oyster.  I'm not very good at estimating how much yarn I'm going to need if I alter the size of a project from what is stated in the pattern ~ hence all that leftover yarn from Olive's blanket that I still haven't used up, despite making the bonus blanket 😲  At least anything that may be leftover from this ruffle blanket can be put to good use for making more dishcloths as and when I need them😉

So as you can see, the projects are starting to stack up a tad.....goodness knows when I'll get the guest bedroom blanket finished!  


Whilst I was very good and didn't let myself be tempted to add to my decidedly not-insubstantial yarn stash, I did succumb to the allure of a tapestry kit that I'd had in my WW wish list for a while.  After all, how could I be expected to resist the rather pleasing 15% discount 😏   


I had been planning to repot the houseplants in the living room on the days I can't get out in the garden, but I guess I won't now be disturbing my schlumbergera any time soon!  It seemed to just suddenly be full of buds although I should, of course, have been expecting them to be putting in an appearance now that we're into October.  The flowers are a very pretty pale pink, and really add a cheerful note to the long, dark, days of autumn and winter.  Oh well, Miss Schlumbergera will just have to wait until she's finished blooming for her repotting ~ I've still got plenty of her companions to keep me occupied in the meantime 😊 

Thursday, October 10, 2024

Deconstruction


Adrian was also busy last week, beavering away in what was the old fruit cage area to turn it into both a more manageable space and another little place for seating.


The beds are now mostly emptied out, and the few remaining plants and shrubs in the bed to right will be removed soon.  The two hollies are ear-marked to fill the gap in the side hedge border on the other side of the garden.  There are also a couple of ferns and an alchemilla mollis in the bed, which may go over in the raised bed on the far side of the garden at the house-end of that border.  I had thought that I might move the fuchsia, which is currently helping to smother the nature pool, over to that bed but quite frankly it grows so horribly vigorously that I think the best thing will be to just remove it altogether!  Instead I am considering filling the raised bed with a variety of ferns.  As well as the two in the bed above there is another in the path border that will have to be moved, along with at least one in another border that could be moved to the raised bed as well.  Alas, sadly for my enjoyment quota although not for my purse of course, methinks there will be no necessity to indulge in a nice little spot of online plant shopping 😄   


Anyhoo, enough talk of plant shopping and back to the job in hand.  Although Adrian had already dug out a lot of the soil from the centre bed, as he started to dismantle it he realised that he would have to dig out even more to come down to ground level!  Rather than trundle it round to the new soil mountain in the back garden, he decided to just bag it up for now and use it first in due course.


He also suggested that whilst we were repurposing the boards from the centre bed to make the right-hand bed taller, why not just plough ahead and buy in some additional boards to increase the height of both the beds?  As you can imagine, I thought it was a very good idea.  Not only would it make weeding said beds more comfortable, it should also ensure that we will be able to get rid of the soil mountain and hopefully at least some of the not-completely-composted-compost that we had to empty out of the bins earlier in the year.  Two birds with one stone 😉 


We had some oddments of weed membrane leftover and Adrian made good use of them to cover over the bare soil where the centre bed had been.  As they were odds and ends he had to do a fair bit of overlapping but at least it's put them to good use.  For now, he's simply pulled over the stone chippings that had been pushed to one side whilst the bed was being dismantled.  Once the other two beds have been made higher and filled with soil, he will then spread out a layer of new stone chippings which will finish off what we had left over from the earlier Big Job.  Speaking of which, it's now become apparent that we will need at least two more bags of the bloody things delivered at some point 😒 


By the weekend we were both pretty knackered to be honest so we didn't do anything out in the garden on Saturday, plus it rained in the afternoon.  As it was dry on Sunday morning, though, we decided to do a job that we've talking about doing for ages: give the lawn a jolly good raking over.  It's not much of a lawn, to be fair, but we just haven't had the time nor inclination to improve it.   


In all honesty, although we did rake up a good bit of moss, the "after" photo doesn't look all that much different to the "before" one!  OMG, it was bloody hard work too!  So guess what Adrian spent the afternoon doing whilst we both bemoaned our aching backs and shoulders.....yup, you guessed it, comparing the merits of various electric lawn scarifier/rake machines 😉